How to Propagate Pothos in Water or Soil: Step-by-Step Beginner Guide
By Alexios Papaioannou · PlantasticHaven · Last reviewed June 18, 2026
Quick answer: To propagate pothos, cut a healthy vine just below a node, keep at least one node on every cutting, and root the cutting in water or a lightly moist, airy potting mix. Water propagation is easiest for watching roots form; soil propagation avoids a bigger transition later. Leaf-only cuttings without nodes will not become new pothos plants.
Amazon affiliate disclosure: PlantasticHaven may earn from qualifying purchases through Amazon links. These picks are matched to this specific guide because: propagation/transplant care where tools directly affect success.
Relevant Amazon picks for How to Propagate Pothos in Water or Soil
Start with the plant problem first, then choose only the supply that solves it. Skip any product that does not match your light, pot size, watering pattern, or plant condition.
Propagation station or cutting jars
Keeps cuttings upright, visible, and easier to monitor while roots form.
Clean micro-tip pruning snips
Clean cuts reduce stem damage when taking cuttings or removing weak growth.
Rooting hormone for cuttings
Useful for harder-to-root cuttings; skip it for easy water-rooting plants if not needed.
Clear nursery pots with drainage
Makes root development and moisture easier to check after transplanting.
Use this page when: you want a practical answer, a diagnosis table, and a step-by-step plan you can follow without guessing. The advice below uses the same language plant owners search for naturally, including how to propagate pothos, pothos propagation, propagating pothos in water, pothos cuttings, pothos node, pothos propagation in soil, while keeping the article focused on the actual plant problem rather than keyword stuffing.
The practical answer before you touch the plant
To propagate pothos, cut a healthy vine just below a node, keep at least one node on every cutting, and root the cutting in water or a lightly moist, airy potting mix. Water propagation is easiest for watching roots form; soil propagation avoids a bigger transition later. Leaf-only cuttings without nodes will not become new pothos plants. The fastest way to improve the plant is to match the visible pattern to the root cause. Do not water, repot, prune, fertilize, and spray in the same session unless there is active rot or a spreading pest outbreak. A plant that receives one correct change is easier to read than a plant hit with five emergency fixes at once.
Most indoor plant failures come from a small set of repeated conditions: weak light, a pot without drainage, dense old mix, watering by habit, roots sitting wet, a plant placed near heat or cold, or pests that were not identified early. The rest of this article turns those conditions into clear decisions so you know what to do first, what to ignore, and when to escalate.
Decision table: choose the safest next step
| Goal | Best method | Why it works | Mistake to avoid |
|---|---|---|---|
| Fastest beginner success | Water propagation | You can see roots form and remove rotting pieces quickly. | Submerging leaves or using a node-free cutting. |
| Least transplant shock | Soil propagation | Roots form directly in the medium where the cutting will grow. | Keeping the soil wet instead of lightly moist. |
| Fuller mother plant | Root and replant several cuttings | New rooted vines fill bare areas in the original pot. | Adding too many cuttings to a pot that already has soggy soil. |
| Long-term climbing growth | Root cuttings and train upward | Better light and support help vines produce stronger leaves. | Trying to train brittle old vines sharply around a support. |
This table is meant to prevent the most common mistake: treating every symptom as the same problem. Similar-looking leaves can come from opposite causes. Drooping can happen when roots are dry or when roots are suffocating in wet soil. Yellowing can be normal aging or a root-zone warning. Spots can be pests, scorch, salts, or disease pressure. The best first step is the one that checks the plant without creating new stress.
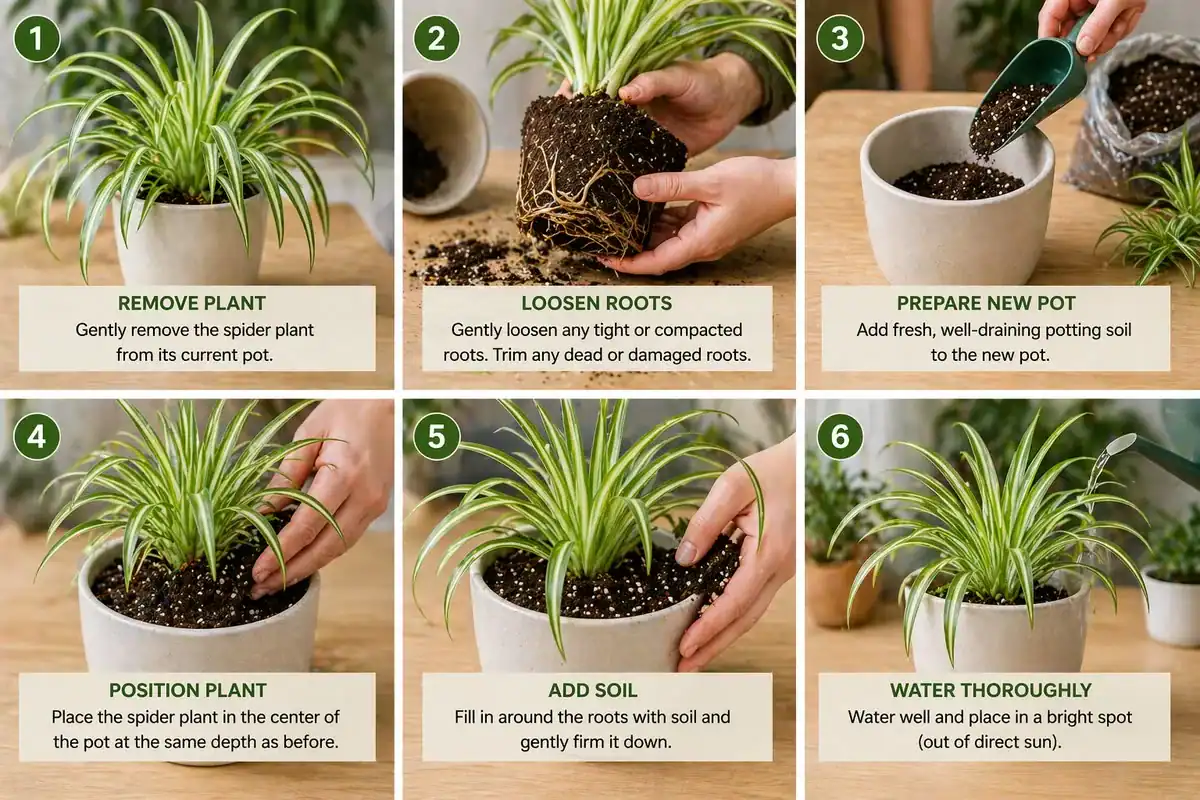
Step-by-step method
- Choose a healthy vine with firm leaves and visible nodes.
- Clean your scissors or pruners before cutting.
- Cut just below a node so each cutting includes at least one node and one healthy leaf.
- Remove any leaf that would sit below water or under soil.
- Place the node in water or tuck it into lightly moist mix.
- Keep cuttings in bright indirect light, away from hot direct sun.
- Refresh water when cloudy or check soil moisture before it dries completely.
- Pot up once roots are established and the cutting resists gentle movement.
How to read the plant before you change the routine
The most useful habit with how to propagate pothos is to slow down for one minute and read the whole plant. A single imperfect leaf can be old damage, but a repeating pattern tells you the plant is responding to something in the room. Check the newest leaves, the oldest leaves, the stem or crown, the surface of the soil, the drainage holes, and the weight of the pot. Those clues matter more than a rigid care calendar.
Start with moisture and light because they control almost every indoor plant decision. A plant in strong indirect light can use water faster, grow denser leaves, and recover from small mistakes more easily. A plant in weak light grows slowly, uses water slowly, and can look overwatered even when you are not pouring huge amounts of water. The room decides how often the roots receive both moisture and oxygen.
Next, check whether the symptom is spreading. Old leaves that are already scarred, yellowed, torn, or curled usually do not become perfect again. What matters is whether new growth looks cleaner and whether the same problem keeps appearing after you correct the obvious cause. If the newest growth is healthy, the pot dries predictably, and the plant holds itself firmly, the routine is probably moving in the right direction.
Be extra cautious when the symptom is spreading quickly, the soil smells sour, the base feels soft, pets have chewed the plant, or pests are visible on more than one plant. That is the point where guessing becomes risky. Do not stack every fix at once. Changing the soil, moving the plant, watering differently, pruning hard, fertilizing, and spraying on the same weekend can create a second stress event that hides the original cause. Pick the safest likely cause, correct it, and observe for a full cycle unless the plant is actively rotting or pests are spreading.
A strong recovery pattern looks like this: new growth looks normal, the plant stops declining, the pot dries at a predictable pace, and no new pests or soft tissue appear. A weak recovery pattern looks like repeated wilting, a sour pot smell, fresh yellowing on new leaves, collapsing tissue, sticky residue, webbing, or soil that never dries. When the weak pattern appears, go back to the root zone and the light source before buying another product.
For most readers, the best care upgrade is not a complicated product. It is a more accurate check: look at light, feel the soil, lift the pot, inspect the undersides, and confirm drainage. Once those checks become routine, the plant usually becomes far easier to maintain.
Water propagation vs soil propagation
Water propagation is popular because it gives instant feedback. You can see whether the cutting is rooting, rotting, or doing nothing. That visibility is useful for beginners, for classrooms, and for anyone who wants to learn what healthy new roots look like. The tradeoff is that water roots must later adjust to potting mix. The transition is usually manageable when the cutting is moved before roots become extremely long and tangled.
Soil propagation gives less visual feedback, but it can create a smoother long-term transition because roots form inside the medium where the cutting will continue growing. The tradeoff is moisture control. Soil cuttings need enough moisture to avoid shriveling but enough oxygen to avoid rot. A tiny pot, bright indirect light, and a loose mix make that balance much easier.
What makes a cutting fail
Cuttings fail for predictable reasons: the cutting lacked the correct growth point, leaves were buried or submerged, the water became stagnant, soil stayed wet and airless, the room was cold, or the cutting sat in light too weak to support recovery. When a cutting fails, do not assume propagation is difficult. Usually one condition was wrong and can be corrected on the next attempt.
Beginner mistakes that slow pothos propagation
The most common propagation mistake is taking a piece that looks leafy but does not include the structure that can produce new roots and growth. Leaves help the cutting stay alive, but the growth point is what creates the next plant. Before every cut or division, pause and identify the node, crown, pup, or rooted section that will actually continue growing.
The second mistake is treating propagation like decoration instead of plant care. A pretty jar or shelf is fine, but the cutting still needs clean water or suitable mix, bright indirect light, stable warmth, and protection from rot. A propagation station in a dark corner can look beautiful while the cutting slowly weakens.
The third mistake is using too much container. A small cutting in a large pot sits inside more wet mix than its roots can use. That unused wet zone goes stale indoors. Start with a small drainage container, keep the medium controlled, and size up after roots and growth justify it.
Choosing the best method for your exact goal
Choose water propagation when you are learning and want to see root growth. Choose soil propagation when you are comfortable controlling moisture and want the cutting to adapt directly to potting mix. Choose division when the plant already has natural rooted sections and you want the fastest, least dramatic recovery.
If the parent plant is stressed, take only the healthiest usable material. Propagation can be a rescue method, but it should not strip the plant of every remaining leaf or crown. A weak plant still needs enough healthy tissue to recover.
How to know propagation is working
Successful propagation often starts quietly. The cutting may not produce new top growth while it is building roots. Look for firm tissue, leaves that remain hydrated, no sour smell, no collapsing base, and early root nubs from the correct area. In soil, resistance to a very gentle tug can mean roots are starting to anchor. Do not keep pulling the cutting up to check progress.
Failure signs are clearer: cloudy water that smells bad, blackening tissue, a mushy cut end, rapid yellowing, or a cutting that collapses from the base. Remove failed pieces quickly and correct the condition before trying again.
Aftercare after potting
The first few weeks after potting are a transition period. Keep light bright but indirect, avoid fertilizer, and keep moisture more even than you would for a fully established plant. The goal is to prevent fragile new roots from drying completely while still allowing oxygen into the mix.
If several cuttings are planted together, space them so each stem has soil contact and light. Do not bury leaves, pack the surface tightly, or crowd wet cuttings so much that air cannot move. A full pot should still be a healthy pot.
Propagation troubleshooting matrix
| Problem | Likely cause | Fix |
|---|---|---|
| Cutting stays green but never roots | Wrong cutting point, weak light, or low warmth | Confirm the growth point and move to brighter indirect light. |
| Cut end turns mushy | Rot from stagnant water or wet, airless mix | Remove the failed section and restart with cleaner conditions. |
| Leaves yellow quickly | Stress, too little light, rot, or too much lost root support | Check the base and simplify the setup. |
| Roots form but plant struggles in soil | Transition shock or mix kept too dry/wet | Use a small pot and keep moisture lightly even at first. |
| New plant looks sparse | Too few cuttings or weak light after potting | Improve light and add more rooted cuttings gradually. |
What makes this a complete how to propagate pothos method
A quick tip tells you to place a cutting in water. A complete method explains where to cut, why the growth point matters, how wet the setup should be, when to pot up, what failure looks like, and how to care for the new plant after roots form. That is the difference between one lucky cutting and a repeatable propagation system.
Real-world examples for pothos propagation
Search results often give short answers, but indoor plant care happens in specific rooms with specific habits. Use these examples to match the article to your actual home before you decide what to do next for how to propagate pothos.
The first cutting
Take fewer cuttings than you think you need and make each one correct. One cutting with the right growth point is more valuable than five pieces that cannot root.
The cloudy water jar
Cloudy water is a signal to refresh the setup and check for rotting tissue. Clean conditions help roots form without decay taking over.
The cutting that has roots but no new leaves
Root growth often comes before visible top growth. Keep the cutting stable and avoid fertilizing too soon.
The cutting that collapses
A collapsing base usually means rot or a weak cutting. Remove it and restart with cleaner tools, brighter indirect light, and a better moisture balance.
The fuller pot project
Several rooted cuttings can make a sparse plant look full, but the pot still needs drainage, airflow, and enough light for every stem.
The post-potting slowdown
A new plant may pause after being moved to soil. Keep conditions steady and judge by firmness and new growth, not immediate speed.
Reader-safe final checklist
- Confirm the plant or problem before treating it.
- Check light, drainage, soil moisture, and root-zone clues before buying supplies.
- Use one correction at a time unless rot, pests, or pet ingestion makes faster action necessary.
- Keep pets, children, food-prep areas, and aquariums in mind before using any product.
- Judge recovery by new growth, stable roots, predictable dry-down, and stopped spread.
- Use the internal links in this article to move to the next most specific PlantasticHaven guide instead of searching randomly.
The best result is a plant-care decision you can explain: what you saw, what you checked, what you changed, and what you will watch next. That is what turns pothos propagation from a frustrating search query into a manageable houseplant routine.
Exact pothos propagation timing notes
Pothos cuttings root fastest when the cutting is firm, the node is healthy, and the room is warm enough for active growth. If the plant is sitting in a cold window or a dark shelf, rooting can slow even when the cutting was made correctly. Bright indirect light is more important than constantly changing the water, adding fertilizer, or moving the jar around every day.
When you plant rooted cuttings back into the mother pot, do not bury the vine too deeply. The node should contact the mix, but leaves should stay above the surface. Water gently after planting and keep the pot stable while the new roots adjust. The goal is a fuller pothos that keeps growing, not a crowded pot of wet stems.
Common mistakes to avoid
- Changing everything at once. One well-chosen correction beats five guesses.
- Watering without checking the soil. A calendar can remind you to inspect the plant, but it should not decide for the roots.
- Ignoring light. Low light slows growth and dry-down, so many water problems are really light-placement problems too.
- Using products as shortcuts. Fertilizer, sprays, meters, and mixes help only when they match the diagnosis.
- Judging recovery by old damage. Watch new growth and whether the problem stops spreading.
- Forgetting pets and children. Plant placement matters as much as plant care in shared homes.
Simple 30-day action plan
| Timeframe | What to do |
|---|---|
| Day 1 | Take clean cuttings with the correct growth point, set them in water or soil, and label the date. |
| Days 2–7 | Keep light steady, remove submerged leaves, and keep soil cuttings lightly moist rather than soggy. |
| Week 2 | Check for rot, cloudiness, shriveling, or early root formation without pulling cuttings repeatedly. |
| Weeks 3–6 | Pot up rooted cuttings when roots are established enough to handle a small transition. |
| After potting | Keep the mix slightly more even at first, then shift toward the normal dry-down routine. |
FAQ
Can I propagate pothos from one leaf?
Only if that leaf is attached to a stem section with a node. A single pothos leaf without a node may stay green for a while, but it cannot produce the root and shoot structure needed for a new plant.
Is water or soil better for pothos propagation?
Water is easier for beginners because root growth is visible. Soil is better when you want the cutting to adapt directly to potting mix. Both work if the cutting has a node, receives bright indirect light, and avoids rot.
How long should pothos roots be before planting?
Do not wait for an enormous tangle of water roots. Pot the cutting when it has a small usable root system that can anchor into a small container, then keep the mix slightly even while it adjusts.
Why did my pothos cutting rot?
The most common reasons are submerged leaves, dirty water, no node, weak light, cold conditions, or soil that stayed wet without enough oxygen.
How do I make a pothos look fuller with propagation?
Root several healthy tip cuttings and plant them back around the edge of the original pot after they have roots. Improve light and prune lightly so the new growth fills in rather than stretching again.
Sources and useful references
Editorial note
This article is written for normal indoor homes, not perfect greenhouse conditions. The safest plant-care advice starts with observation: light, drainage, soil texture, root health, leaf pattern, temperature, pests, and pet access. Plant response varies by room and season, so the article gives decision rules rather than impossible guarantees.
Last reviewed by PlantasticHaven editorial: June 18, 2026. Before using any pesticide, fertilizer, soil additive, or pet-safety decision, read the label or contact the relevant professional source. For urgent pet ingestion concerns, contact a veterinarian or poison-control resource immediately.