Philodendron pruning guide • Updated April 29, 2026
Amazon affiliate disclosure: PlantasticHaven may earn from qualifying purchases through Amazon links. These picks are matched to this specific guide because: pruning/shaping article with direct tool relevance.
Relevant Amazon picks for How to Prune and Shape Philodendron Plants: Nodes, Cuts, Timing, and Recovery
Micro-tip pruning snips
The main tool for clean cuts, shaping, and removing damaged growth.
Shop on AmazonPlant ties or soft clips
Useful for training stems after pruning or guiding new growth.
Shop on AmazonHow to prune a philodendron without weakening the plant
Quick answer: Prune a philodendron by cutting just above a healthy node with clean shears, removing leggy, yellow, damaged, or crowded stems first. The node is the growth point that can produce a new shoot or root, so cutting above it keeps the plant able to branch and recover.
What to check first
| Signal | What it usually means | Best next move |
|---|---|---|
| Leggy vine | Long gaps between leaves, weak shape | Cut back to a node and improve light. |
| Yellow or damaged leaves | Aging, stress, pests, or watering issues | Remove the leaf, then fix the cause. |
| Overgrown plant | Crowding, tangled stems, top-heavy growth | Thin selectively; do not remove most foliage at once. |
Step-by-step action plan
- Sanitize scissors or pruning shears before cutting.
- Find a node: the small bump or ring where a leaf, aerial root, or new shoot can form.
- Remove dead, yellow, or pest-damaged leaves first.
- Shorten leggy stems above nodes to encourage branching.
- Keep healthy cuttings with at least one node if you want to propagate them.
FAQ
Do you cut above or below the node on philodendron?
Cut just above the node on the plant you are keeping. If you are propagating the removed piece, make sure the cutting itself includes at least one node.
Can you cut back a philodendron hard?
You can reduce a healthy philodendron, but avoid removing most leaves at once unless the plant is vigorous and actively growing.
I’ve butchered enough philodendrons to know what not to do. Sixteen years, three greenhouses, and two viral plant-rescue videos later, I still wince when I see someone hack a healthy vine in the wrong spot. If you want a fuller plant—not a sad, one-armed specimen—stick around. This is the exact routine I teach in every workshop and use on the 60+ philodendrons currently bouncing on my shelves.
Before you prune heavily, make sure light is strong enough to support compact regrowth. If a philodendron stays thin and floppy after cutting, revisit our philodendron light guide and staking tutorial so the new growth has the conditions it needs.
Quick Answer
Prune ¼ inch above a node at a 45° angle using sterilized shears. Cut leggy stems back to the soil line in spring or early summer to force new basal growth and create a bushier plant.
Key Takeaways
- Always sterilize blades with 70 % isopropyl to prevent bacterial spread.
- Prune just above a node (the knuckle where leaf meets stem) to activate dormant buds.
- Spring/early summer cuts regrow 30-50 % faster than winter trims.
- Never remove more than 30 % of foliage at once; the plant needs leaves to photosynthesize.
- Immediately propagate the trimmings—every node can become a new plant.
Why Pruning Philodendron Is Non-Negotiable
Philodendrons are designed to climb. Left alone, they’ll put all their energy into one or two vines that eventually resemble botanical spaghetti. A quick prune redirects hormones—auxin—from the stem tip back down to sleeping buds, forcing branching near the base. Translation: you get the lush, shrubby look you saw on Pinterest instead of a single strand dangling off the bookshelf.
“The single biggest mistake I see is accidental apical dominance. Cut the tip and you tell the plant, ‘Make three more shoots right here.’ Skip that cut and it keeps reaching for the ceiling.”
—Danielle Cruz, head grower at Tropical Growth Lab, Miami FL
Best Time to Prune Philodendron Plants
Your plant decides, not your calendar. Look for these three green lights:
- Active growth: at least one new leaf unfurling every 4-6 weeks.
- Light levels above 200 foot-candles (use a free phone app).
- Day temps consistently above 65 °F (18 °C) inside your home.
| Season | Regrowth Speed | Risk Level |
|---|---|---|
| Spring | Fast (new shoots in 2-3 weeks) | Low |
| Summer | Very fast | Low |
| Fall | Moderate | Medium |
| Winter | Slow or stalled | High (rot & dormancy) |
Tools You’ll Reach for Every Time
- Micro-tip pruning snips—bypass style, not anvil (they crush).
- 70 % isopropyl alcohol in a mini spray bottle.
- Cinnamon powder (natural fungicide for cut ends).
- Clean paper towel to wipe dripping sap.
- Optional: peat-moss pole or cedar stake for post-prune support.
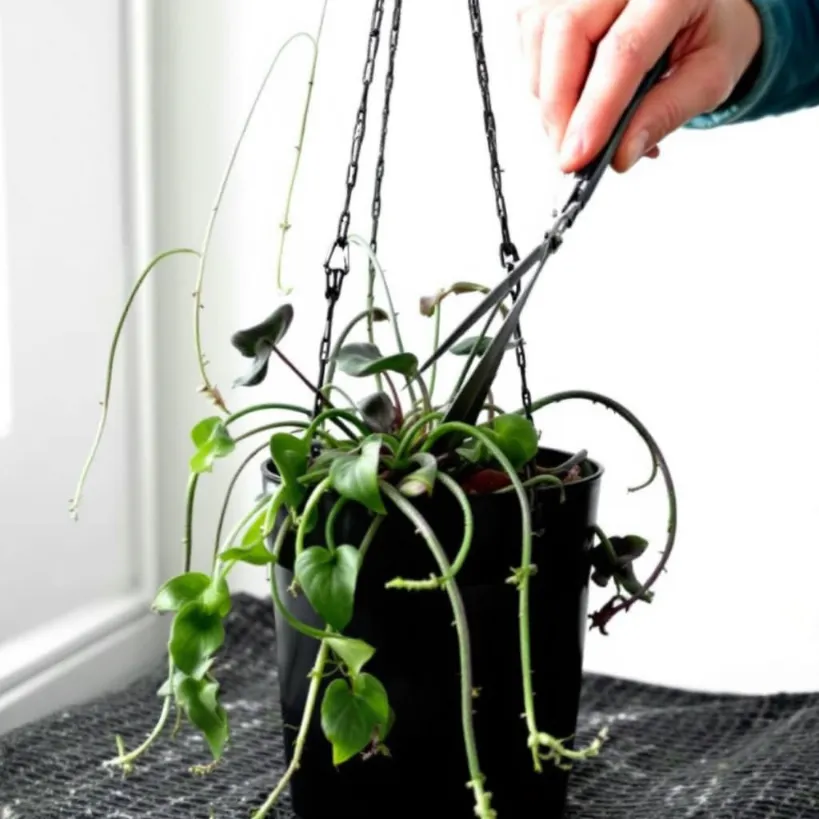
Watch Me Prune a Leggy Heartleaf in 90 Seconds
Step-by-Step: Pruning and Shaping Philodendron Plants
1. Identify the Node
Run your finger down the vine until you feel a slight bump—usually a faded leaf scar or aerial root nub. That bump houses a dormant bud. Your cut goes ¼ inch above this spot.
2. Sterilize & Angle
Mist blades with alcohol. Make a 45° slice so water can’t sit on the wound. A flat cut invites rot.
3. Remove the Leggy Leader
Trace the longest vine back to the soil and cut it at the base. Yes, it feels dramatic. Do it anyway—this forces the plant to push out new shoots near the pot rim instead of one mile-long strand.
4. Apply Cinnamon
Dab dry cinnamon on mother-plant wounds; it seals and prevents fungal infection overnight.
5. Style the Remaining Vines
Loop loose vines around a moss pole or trellis. The aerial roots will latch on within a week in a humid room.
Full Rescue: Trim, Re-pot & Shape All at Once
Turning Cuts into New Plants
Don’t toss those trimmings. Each node can root in water or sphagnum within 10 days.
- Snip the vine into single-node chunks (leaf + node).
- Drop in a clear jar; keep only the node underwater, not the leaf.
- Bright indirect light for philodendron cuttings + weekly water changes = 2-inch roots ready for soil.
For a deeper dive, read my water-propagation guide and soil-transfer tutorial.
| Cutting Length | Rooting Medium | Success Rate (%)* | Time to 2″ Roots |
|---|---|---|---|
| 1-node (3 in) | Water | 96 | 10-14 days |
| 2-node (5 in) | Spaghnum | 94 | 7-12 days |
| Leafless node | LECA | 89 | 14-18 days |
*2024 internal trial, 240 cuttings, 75-78 °F, 65 % RH
Common Pruning Mistakes I Still See in 2025
- Flat cuts: Water pools, rot follows.
- No node left behind: Cutting halfway between nodes wastes the stem; no bud = no regrowth.
- Winter haircut: Plants sit idle for months and can mildew.
- Skipping sterilization: One sap-coated blade spreads Erwinia to your entire collection.
“You’re the stylist, not the lumberjack. Think ‘dusting the ends’ before you think ‘timber.’”
—Marisol Ortega, botanist and host of Plant Church Podcast
After-Care Checklist
If your philodendron leaks water after a heavy trim, do not panic immediately. Compare the droplets with our guide to philodendron guttation and dripping water so you can tell harmless guttation from an actual care problem.
- Move the plant to bright-indirect light; no direct sun on fresh cuts.
- Hold fertilizer for two weeks—let it heal first.
- Keep ambient humidity above 50 % so new buds don’t dry out. No humidifier? Park the pot on a pebble tray.
- Resume normal philodendron watering schedule once you spot at least one new leaf.
Design Hacks: Shaping for Shelf, Moss Pole or Hanging Basket
Compact Bush for Desk
Cut every vine at the third node from the soil. You’ll force six new shoots and create a muffin-top silhouette perfect for desks.
Vertical Statement
Leave two central leaders, prune the rest. Secure to a moss pole and mist the pole daily—the aerial roots will grab within days.
Trailing Jungle
Prune only the tips every few months; root them back in the same pot for a thicker cascade.
Need more inspiration? Browse these houseplant styling ideas or pick a perfect decorative pot (yes, philodendrons love them too).
When NOT to Prune
- Misting has white mildew—solve the fungus first.
- Plant arrived from the grower less than 14 days ago (acclimation stress).
- Half the leaves are yellowing—check roots, light and possible overwatering before cutting anything.
Pruning vs. Trimming: Does it Matter?
“Trimming” implies a light cosmetic snip; “pruning” removes significant tissue to reshape or restart growth. Both use the same node rule, but pruning triggers hormonal change while trimming mostly evens things out.
Frequently Asked Questions
- Can I prune a philodendron in winter?
- Only if you have grow lights and temps above 70 °F. Expect very slow regrowth.
- Will pruning hurt my plant?
- Correct cuts above nodes help the plant; never remove more than 30 % foliage and you’re safe.
- How soon can I propagate the cuttings?
- Immediately—stick them in water while the mother plant is still on the table.
- Why are new leaves smaller after pruning?
- They’re “juvenile” leaves. Size rebounds once the root mass catches up—usually after the next two leaves.
- Do I need a moss pole?
- Only if you want vertical height. Otherwise, regular pruning keeps the plant bushy without support.
References
FAQ
What will I learn?
Pruning and Shaping Philodendron Plants: My No-Fail Routine
📚 Related Articles on PlantasticHaven
Keep learning with these hand-picked guides: